A super effective post workout recovery boosting routine!

We all know (or should) that the process of “working out” or “training” is only effective when carried out in the respect of a crucial equation………
The balance of catabolism and anabolism!
We want a catabolic environment during our workouts – it’s this ‘breakdown’ process that lays the foundation for the ‘rebuilding’ process. However, as soon as your workout is over……..it’s immediately time to flick the switch from a catabolic state to an anabolic state.
Any activity that will aid, promote or enhance recovery is classified as ‘anabolic’. Eating and sleeping are two primal examples of anabolic processes.
Sadly overlooked, disrespected and ignored…….stretching can be an extremely valuable ally after you’ve wrapped up your workout and it’s now time to leave the catabolic zone and step on over to the anabolic zone.
The reason stretching is so important is: It restores muscle length. After you have “thrashed” your muscles during a damn good workout, these muscles naturally have become tight. If they remain tight, as they do when people ignore the need to stretch them! Then over time they will get tighter and tighter, here lies the problem to this…….
As they get tighter, your accessible range of motion for that muscle/muscle group will become gradually ever more restricted. The outcome here in extreme cases is you may not be able to sufficiently execute your favorite movements anymore!
Nobody wants that!
So by just devoting a short period of time to an effective stretching routine, you can ensure you’re doing your utmost to maintain the best possible body you can – as functional as you can be!
Where there is a tight muscle, often the antagonist muscle or the other muscle associated with the particular movement pattern is ‘dormant’. Basically they are inactive and don’t turn “on”.
A balanced body is one which integrates all available muscles for any given movement pattern. Think deadlift – equal distribution of work between the glutes, hips, hamstrings, core and abs, erector spinae, trapezius muscles and the forearms (grip) You DO NOT want a scenario where the glutes are “lazy” and the hamstrings are “work horses” – because the imbalances will only become further facilitated!
Here’s what to do:
This simple to follow, yoga influenced sequence of recovery stimulating moves will work a real treat after a hard training session.
These stretching movements target practically every major muscle group used regardless of the type of training you’ve done. Also, they are structured in a very efficient fashion which utilizes natural transitions from position to position.
#1. ‘Mountain pose’

Nice and simple, let your arms extend comfortably by your sides. Focus on forming a steady flow of breathing. You’ll notice this entire sequence is based around breaths and not time. Reason being, focusing on time is often boring and if you aren’t breathing – your muscles will not open and lengthen as optimally as they could/should!
Hold this for 5 deep breaths, stand nice and straight and keep your head neutral. Once you’ve done this, gently roll head and neck from side to side, looking over each shoulder as you move. Do this for approximately 10 breaths. This will open up the often tight neck muscles.
#2. Forward bend with interlaced fingers

Hinge forward at the waist, try to keep your legs as straight as you can. Don’t worry if you can’t achieve fully straight legs – bend your knees as much as needed to feel a good stretch. Interlace your fingers and hands behind you and extend them upwards as you lean over. Hold this for at least 5-10 breaths.
#3. Lunge position – targeting the often tight hips!

Slowly rise up from the forward bend. Once you’re standing straight, step your right leg back into the position displayed above. Your shin and knee should be comfortably resting on the floor and your front (left) leg should be at 90 degrees or more. Maintain a neutral head position during this pose and feel free to lean forward at the front leg if you wish to intensify the stretch. Hold this for a good 5 breaths. Your hips will get a tremendous stretch here!
#4. ‘Warrior one’ – great lat stretch and shoulder mobility enhancer!

Maintaining the lunge position as above, extend both arms up and overhead. Aim to have your arms in line with your ears, with your head neutral and chin tucked. Again, hold this for a nice, deep 5 breaths and only extend as far as is comfortable.
#5. ‘Half split’ – Brilliant hamstring stretch!

Push back and up from the lunge through the front leg and bend your back leg to around 90 degrees. As you do this, extend your left leg out in front of you as far as you can. Anybody with tight hamstrings (like myself) will REALLY feel this one! Hold this for 5-8 breaths.
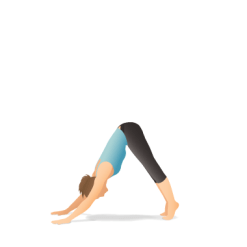
#6. ‘Down facing dog’ – A yoga classic!

From the half split, step both feet back behind you and extend your arms and hands out in front of you and attempt to push your stomach into your thighs (as pictured) you also should aim to get your heels flat on the ground – however anyone with hamstring or ankle inflexibility/tightness may find this tough. Work with your own range and aim to improve over time! Hold this for a nice 10 breaths – this position is great for so many muscles, the lats and hamstrings to mention a couple.
#7. Repeat steps 3-5 for the opposite leg.
#8. ‘Child’s pose’ – some chill time!

As you come down from the down facing dog, sit your bottom down on your heels and extend your arms out maximally (as shown) – a great stretch for the lats! Relax in this position for 10-15 breaths and embrace the open space you’ve created within your muscles!
#9. ‘Pigeon’ pose – let’s get those hips nice and loose!

Come out of Child’s pose and bring your right leg out in front of you and bend it to around 90 degrees. As you do this, straighten your left leg out behind you. If this in itself is enough, then remain here. If you’re more flexible through the hips – then lean forward and aim to have your arms out in front of you as you rest on your forearms (pictured) Hold this for a solid 5 breaths or so, NEVER go into a range that causes pain. Don’t sacrifice comfort for extra range of motion – I say this because Hips tend to be chronically tight in the majority of people.
Repeat for the left/other leg!
#11. ‘Plank’ – Top of a pushup

As you release from Pigeon pose, straighten your body out and enter the plank/top of a pushup position. Your goal here is to have a streamline/straight body and your abs as engaged as possible. Whilst simultaneously keeping your arms extended with your shoulders down and back, as you look down you should be able to see the inside of your biceps turned inward – this is a great stretch for the wrists, forearms and biceps. Hold this for upto 8 breaths (feel free to modify it if you cannot maintain a exemplary plank for this long) It’s not a competition, you only compete with YOURSELF.
#12. ‘Sphinx pose’ – Great for lower back pain!

This is a natural transition from Plank. From the plank, drop your knees down to the ground as you also lower your chest and forearms to the ground (pictured) – keeping your hips and lower abs in contact with the ground, extend your upper torso up through your elbows and forearms. You will feel a great stretch through your lumbar spine. Hang out here for a gentle 5 breaths (more if need be)
#13. Modified ‘Child’s pose’ – deeper lat stretch

As you exit Sphinx pose, bend your knees to 90 degrees and maintain this position as you extend your arms out in front of you (as shown) – this is a slightly intensified version of the original child’s pose. Enjoy this for 5-10 breaths.
#14. Down facing dog with heel raise
From the modified child’s pose, step your feet back and press up into down facing dog. Hold this for 5 breaths or so. Then, push up through your toes (tip-toeing) and hold this for around 3 breaths.
#15. ‘Child’s pose’

Gently lower yourself from the down facing dog and bend your knees as you relax nicely back into child’s pose once again. Enjoy this for around 5 breaths.
#16. Arch pose – great foot stretch!

From child’s pose, sit up right and tuck your toes underneath your bottom. Then allow your bodyweight to apply pressure throughout your feet. This may feel very uncomfortable for those unfamiliar with this stretch! Tight feet is actually very common and few people ever consider ‘stretching their feet’ – If this is reasonably comfortable, feel free to lean back and place your hands flat on the floor behind your as you push your chest up. Once again – only access a range that is pain free. Hold your chosen position for 5 breaths.
#17. ‘Hero pose’ – Targeting the quads and low back!

Release your feet from underneath your bottom and spread your feet out slightly to make space for you to sit between. As you sit between your feet, gradually lean right back, the target here is your head and upper back in contact with the floor (as pictured) – this is a very powerful stretch for the quads (great to use on leg day!) Hold this for around 8 breaths.
#18. ‘Table pose’ – great integrator for the core, hips, glutes, shoulders and triceps!

As you release from hero’s pose, place your feet flat on the floor and bend your knees to 90 degrees. Place your hands below your shoulders, facing forwards (great wrist stretch) as shown. Then contract your glutes (buttocks) as you drive your hips upwards as high as you can. This will be very challenging for a lot of people! But this move stretches and uses many commonly tight muscles. Again hold this for 5 breaths or so, don’t panic if you can’t hold it this long, just release and re-enter the position a few times.
#19. ‘Forward fold’ – Hamstrings, calves, upper and lower spine

Gently lower yourself from table pose. Then extend your legs straight out in front of you, keeping your bottom firmly on the floor. From here, reach your arms forward and attempt to clasp your toes with your hands. For some this may be impossible, but as always; GO AS FAR AS IS COMFORTABLE. Those who are extremely flexible will be able to rest their head/face on their legs and have their elbows ‘slack’. Embrace this amazing position for around 10 breaths.
#20. ‘Corpse pose’ – The perfect conclusion!

Keeping your legs as they are in the forward fold, slowly raise your torso upwards and lower it in the opposite direction (flat on the ground) as you let your arms hang loosely out to your sides. Feel free to close your eyes and enjoy the new found length within your muscles and give yourself praise on your accomplishment – a hard workout and great stretching session! Hold this for as long as you like.
So there you have it, a 20 move yoga influenced and based routine. In which targets virtually every major muscle group that gets worked throughout every form of physical exercise.
This routine is tried and tested and should take around twenty to thirty minutes when done correctly (not rushed)
Give it an honest try and please let me know your thoughts!
Let’s all work towards eradicating sadly common muscular imbalances with simple movements such as this!
We all have 20-30 minutes to invest in ourselves………….NO exceptions!
JR @ Straight-Talking-Fitness View All
The 'brains' behind StraightTalkingFitness, a site all about discovery that leads to strength in all formats; fitness, mental, emotional and spiritual. Everything starts from within and projects outwards. Master the body, master anything and everything.